For large projects multiple artists might be creating animations simultaneously. In cases like this, trying
to coordinate the sharing and working on only one Spriter Project would prove inconvenient to say the
least.
For this reason, Spriter has a feature which allows for each artist to create their animations in their own
independent Spriter Projects which can then be merged into a single Spriter project.
Importing One Spriter Project Into Another (Pro Only)
Spriter Pro User’s Manual version 1.4


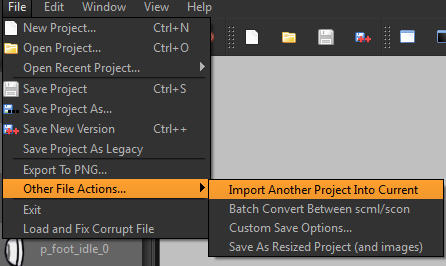
1) Start up Spriter and load in the
Spriter file you’d like to merge the
second file into. Then from
Spriter’s menu, choose: File/Other
File Actions/Import Another Project
Into Current.
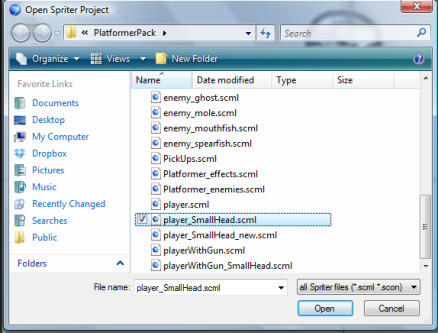
2) The File selector dialogue will
appear. Use it to navigate to and
select the Spriter file (scml or scon)
which you’d like to merge with the
currently opened one.
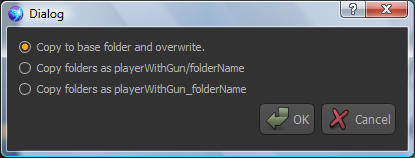
3) A new dialogue box will appear letting you choose one of three different merging options. These pertain
to how images and their folders will be dealt with during the merge.
Copy to base and overwrite) The first option will copy everything over to the main project folder of the
currently opened file without renaming any image files or folders. This option is most useful when multiple
artists might be using some of the same images from the same image folders to make animations...such as
using some of the same effects images, or each actually creating different animations for the same character.
Be very careful when working like this...to make sure no one will lose their own work, its best practice to
adopt a file naming convention where each image and animation that an artist creates will start or end with
the initials of that artist. This would insure that if multiple artists end up creating images with would
otherwise have been given the same name, that one won’t overwrite the other when being merged...because
for example one image would be named MP_head_0 and the other EM_head_0.
Copy folders as *name of file being imported/foldername) This option will safely create a single folder
in the main folder of the Spriter file currently opened and copy all of the image folders and files of the
Spriter project being imported into this new folder...thus ensuring that none of its image folders or files will
overwrite any belonging by the currently opened file.
Copy folders as *name of file being imported_foldername) This option will automatically change the
name of all image folders being imported with the name of the file being imported as the prefix...this would
insure that no images from the currently opened file could possibly be overwritten. This option is best if
you’re merging Spriter files which don’t share any images in the first place.
NOTE: While the second two merging options are very safe, they can be wasteful if each of the projects
being merged share identical images..because once merged using the last two options, they won’t be sharing
the same image files, they’ll be separately using identical looking but independent files. Safe, but
wasteful... so if all artists are animating using many of the same images, its recommended you use the first
option, BUT to have named your image files and folders carefully so no one will lose any of their work.
WARNING: This is an advanced feature which causes permanent changes to scml or scon files as
well as copying image files and folders into the main folder of the target Spriter Project. For this
reason you should ALWAYS make backup copies of all Spriter Projects before using this feature!
Also, while in the process of backing up its important to note that for Spriter to merge two projects, they
must start completely separately...meaning in separate main folders. You can not merge Spriter files
(scml or scon) which are already in the same main project folder....so If you need to merge two such
Spriter files, then you’ll first need to make 2 copies of the entire folder which includes both Spriter files.
Now that you’ve backed up the Spriter projects, here are the steps to merge one Spriter project into
another:
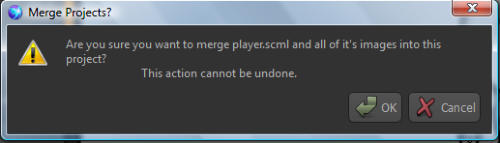
4) Once you’ve selected your merging method, a final dialogue will appear giving you the option to continue
or cancel. If you’re ready to merge, click OK and the file you selected will merge into the currently opened
one. When the process is finished you should see all entities from the file you selected appear at the bottom
of the entities list in the currently opened file.