By default when you hold the Alt key and left click and drag in the canvas, you’ll create a bone. There are
actually two other types of objects you can create via this method which aren’t used for animation, but
instead are for game-play related information. One of these two objects is collision rectangles. Collision
rectangles can be used by a game engine to designate the actual areas the game will detect collisions with.
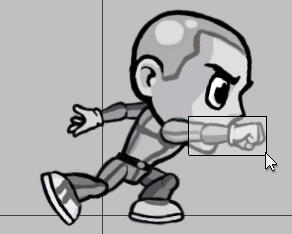
For example, during a punch animation, you can create a collision rectangle to designate the area of the
animation (near the fist) which the game would use to see if the punch makes contact with enemies in the
game. You could also use collision rectangles to designate regions of the body which would take different
amounts of damage from attacks, or would trigger different reactions if collided with.
To create Collision rectangles, do the following:
Adding Collision Rectangles to Frames
Spriter Pro User’s Manual version 1.4


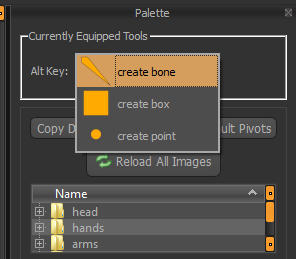
1) Left click on the Currently Equipped Tool type at the top
of the Palette located near the top right of your screen, and
select “create box”
2) Make sure you’re at the point in the timeline (or
keyframe) you want the collision rectangle to exist, then
hold the Alt key and left click and drag on the canvas to
create your collision rectangle. You can then copy and paste
it to other keyframes, or use the paste to all keyframes
option to propagate the Collision rectangles across the entire
animation.
3) Once in place, if left click, transform gizmo’s appear so
the rectangle can be stretched, rotated, and have its pivot
point changed just like images(sprites) can. These
differences will be tweened between keyframes which
include the same collision rectangle!

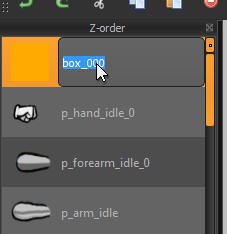
4) By double-clicking on the name of the rectangle in the Z-order
palette, you can give it any name you’d like for easy recognition of the
rectangles purpose.