As mentioned in the previous section, you can apply multiple character maps at the same time, with, for
example, one controlling the pants style, one controlling shirt, etc etc. This provides a very effective way
of letting you mix and match possible combinations to create or allow for a massive amount of possible
combinations for characters, props etc. Our “RPG Heroes Art Pack” uses this exact methodology to let
you create custom RPG character portraits and Sprites. We’ll be using it in this section as a reference.
Once you’ve taken the time to create a custom character by activating several character maps from a large
selection, you wouldn’t want to have to redo this every time you load the art pack into Spriter, to export
new animations, or make tweaks to the character like change the hat they are wearing etc. For this
reason, Spriter Pro lets you actually save out the currently active character maps, (along with any custom
color palette selection you’ve done, which is explained here), so you can easily reload them whenever
you need to get back to that specific character set-up.
Here’s how:
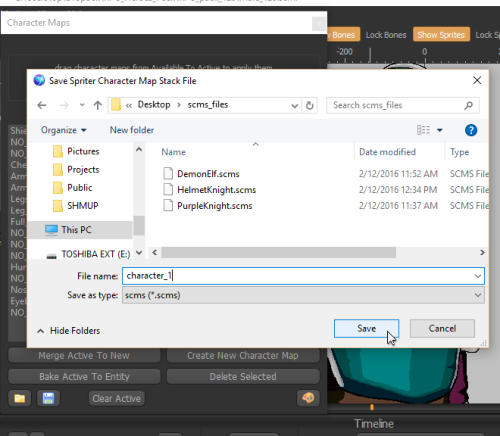
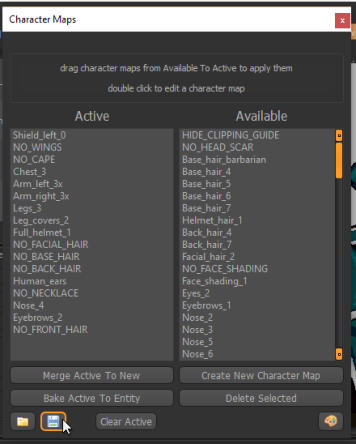
1) First drag any character maps you’d like to the “Active” column on the left side of the “Character
Maps” palette. If you change your mind on any character map, just drag it back to the “Available”
column. Once you are happy with your new custom character, Click the small, blue computer disk icon
near the lower left of the “Character Maps” palette.
Saving Character Map Sets as Character Files
Spriter Pro User’s Manual version 1.4


2) Choose a destination folder (it doesn’t matter where, so long as you remember where you saved it and
remember which Spriter Project it works with… we recommend making a folder specifically for
character files for each specific Spriter project you work on that requires character files)
3) Choose a name for your character file and save. That’s it!
You can now reload this character (set of activated character maps) whenever you’d like by first loading
up the specific Spriter (scml or scon) file that it pertains to, then opening the “Character Maps”
dialogue, clicking the yellow folder “load file” icon at the lower left of the “Character Maps” palette,
then directing Spriter to your desired character file.
What’s really cool is, even among different and separate Spriter file or projects, so long as you name all
of the character maps exactly the same (and make them apply the same sorts of visual changes, for
example “blue pants, red shirt etc”) then you can make the separate Spriter projects compatible!
We did just that when we created the RPG Heroes Art Pack! Because of this, the user can create a
customized character in the high res version, save out the character, t hen load up that same character as
either a 48x48 or 32x32 pixel art version in those respective Spriter files!