Unless your needs are quite high resolution to begin with, it’s often a good idea to create your Spriter
Project at a larger scale than the final result needed for your game. For example, if you are animating a
character for your game who will stand at roughly 128 pixels tall in the final game, you might want to
make your Spriter project and art so that your character stands at 256 pixels tall inside Spriter. (Note: This
is not the case if you’re specifically making a retro style pixel art game, in which case, you should work at
exactly the same scale as the finished game will need.)
Here’s why:
Working at a larger size means you can work faster and sloppier when creating your artwork in the first
place, because when you eventually scale it to 50 percent of the full size, it will look much cleaner.
Working at a larger scale also means if you are creating a game where the camera can zoom in or out, then
when the camera zooms in your character wont become pixelated or blurry. (until or unless the camera
zoom exceeds the size of the actual character art.)
If you work at the larger size you’ll have it to use for marketing art or a future, high resolution sequel
should the need ever arise.
What to be careful of:
If your game is already going to need large, high resolution art, made of many images in the hundreds or
thousand plus pixels in height or width, You should avoid working at a larger scale as you’ll likely run
into performance issues or even crashes if the number and size of the images being used exceeds the
available graphics memory.
Whether you are in need to enlarge or reduce your Spriter project, Spriter Pro makes this easy.
Here’s how:
1) BACK UP YOUR ENTIRE SPRITER PROJECT! This is true for any creative person using any
software to create data they want to keep. We highly recommend you use a back-up system with version
control. This way you can always revert back to any older version of your project in case of an emergency.
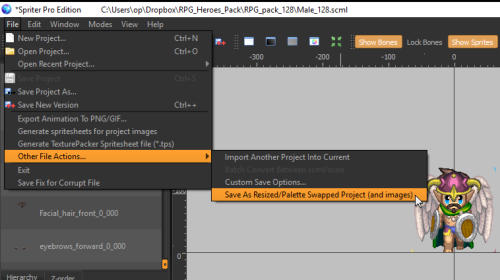
2) Choose File|Other File Actions|Save as Resized|Palette Swapped Project (and images) from Spriter’s
menu. Note: If your project uses indexed color images this process will result in the images in the cloned
copy losing their indexed color mode and they will no longer work with color palette customizations, so
be sure to keep the original Spriter project backed up so you can always retrieve the original images
whenever needed.
3) The “Resize Project” Dialogue will appear.
Change the size ratio as you’d like (1.0 is full
size, 0.5 is half size, 2.0 is full size etc.) Then
click “Save”
4) Be sure to guide the file dialogue to a new folder of choice where the scaled project will be saved
(create one if need be) and then choose save. Spriter will do its thing, and the next time you check in your
designated folder there will be a complete scaled clone of your Spriter project.
Creating a Scaled Clone of a Spriter Project (source images and all)
Spriter Pro User’s Manual version 1.4