There are many ways to create a key-frame for a single object, all selected objects, or everything on the
canvas (in the currently location on the time-line) with Spriter.
By default, making any kind of change to a sprite or bone will create a key-frame for that object wherever
you happen to be in the time-line.
There can be time's however, where you would like to “key” one or more objects at a point in the time-line
without altering it. This can be useful to “protect” the position, angle width, height and opacity of an
object at that specific point in the time-line, so that when you alter a later point in the time-line, the objects
you've keyed stay the way you wanted them to in the previous spot in the time-line.
There are other times where you'd like to do the same for the entire frame. (everything in the canvas at that
point in the time-line).
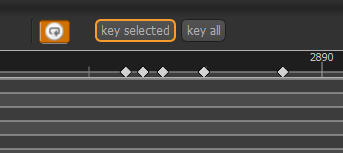
For these sorts of situations there are two useful
buttons toward the top-right of the time-line
window.
The “Key selected” button will create a key for any
objects you currently have selected in the canvas at
the current point in the time-line.
The “Key all” button will create a key for all objects
that exist in the canvas at that point in the time-line whether or not they are selected.
Key All Versus Key Selected
Spriter Pro User’s Manual version 1.4