One of the most powerful and easy tools people use to control what can happen any any given time in
their game is called a “state machine”. In a nutshell, a state machine is the part of a game engine that
follows the games logic and decides what can happen in any given situation depending on the “state” of
the objects involved. In the previous chapter “Adding Variables to an Animation” I used the example of a
player character’s punching animation.
Ideally when a game engine checks the collisions of things, such as the player with an enemy, it
simultaneously checks to see if the enemy is currently in a state where it should be able to take damage
etc. The tricky part is, depending on the design of any given game, a character/entity might be able to be
in several states at once. Spriter Pro can help you perfectly designate, organize and “stack” any number of
state possibilities per entity, per animation, per millisecond.Adding Tags to an Animation Spriter Pro
User’s Manual version 1.0 Quickstart Sprites Bones Animating Character Maps Index
EXAMPLE: In this example we have an enemy character with three animations: idle, getting hit, and
blocking (guarding). The first animation we’ll add a tag to is “idle”.
Adding Tags to an Animation (Pro Only)
Spriter Pro User’s Manual version 1.4


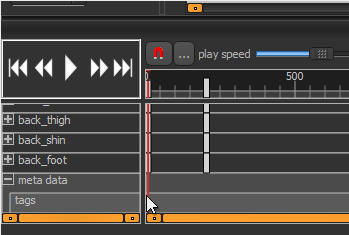
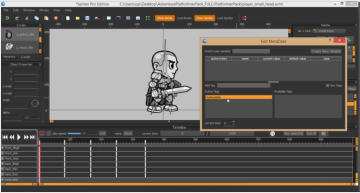
1) Choose the Idle animation, expand the time line palette upward to reveal the individual object
timelines, and then scroll to the very bottom so we can edit the metadata timeline for the entire
animation. Doubleclick on the metadate timeline right at the very beginning (zero milliseconds).
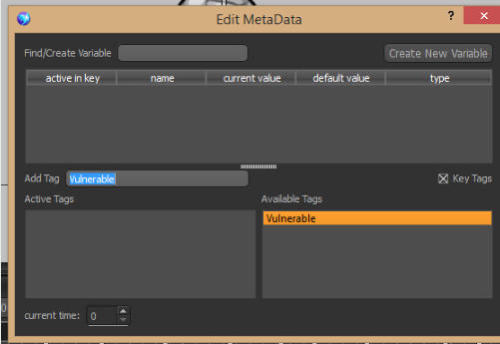
2) This will bring up the “Edit MetaData” dialogue box. This time, instead of creating a variable, type in a
name in the “Add Tag” box and press enter. In this example I’m creating a Tag called “Vulnerable”. Once
you press enter, you should see the tag you just created in the “Available Tags” column.
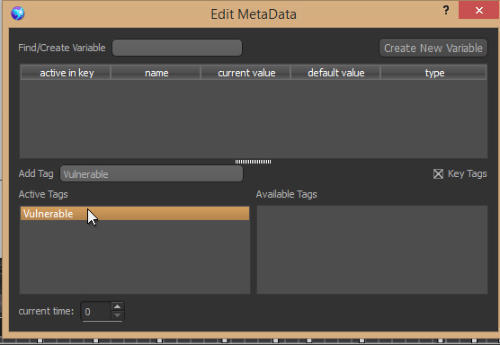
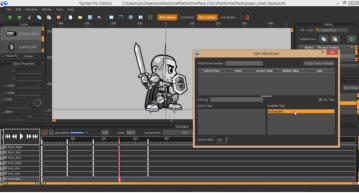
3) Now check the ”key Tags” checkbox toward the middle right of the dialogue and then drag the name o the
Tag you just created from the “Available Tags” Collumn to the “Active Tags” column. Not only have you
created the Tag, but you’ve also told Spriter that starting at the beginning of the animation, this Tag is
active...in other words, from the start of this animation, one of the states of this entity is
“vulnerable”!...meaning, it can get hit and take damage from the player.
4) Now lets go to the “getting hit” animation.
The tricky part of a characters getting hit animation in a game is (depending on the game) the enemy getting
hit should no longer be vulnerable to new damage until after the getting hit animation is finished playing, or,
should not be vulnerable to additional damage until at least a certain amount of the getting hit animation has
played. This allows for instances like the ability to repeatedly hit enemies with a sequence of attacks in a
fighting game etc.
For this example, we’re going to make the enemy impervious to other damage for the first half second of his
getting hit animation, and then once again vulnerable to attacks after that initial half second.
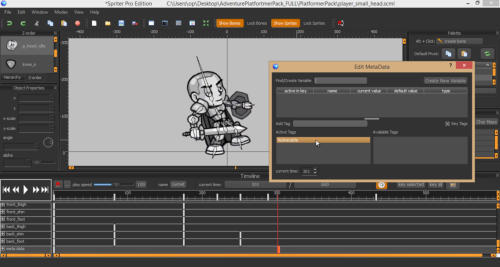
Go to the mid-way point of the Meta Data timeline for the entire animation (the very bottom of the timeline
palette) and double click to bring up the “Edit MetaData” dialogue. You should see the “Vulnerable” Tag
already in the “Available Tags” column. No need to recreate it. Tags are automatically universal throughout
the Entity you create them for.
Drag the “Vulnerable” Tag from the “Available Tags” column to the “Active Tags” column, making sure the
“key tags” checkbox is checked (on).
Finally, use the “current time” box at the very bottom-left of the “Edit MetaData” dialogue in order to
navigate back to the very beginning of the timeline (zero) and then make sure the “Vulnerable” Tag is in the
“Available Tags” and not the “Active Tags” column. Now the enemy’s “Vulnerable” Tag (or state in this
case) should be invulnerable for the first half of the getting hit animation and vulnerable for the second half
of the animation.
5) For the Blocking animation we would follow the same steps as above... in this case, for the first fraction
of a second, the enemy character does not yet have his guard up and should therefore have the “Vulnerable“
Tag active, and then from that point on in the animation should not be vulnerable...in other words, make sure
from that point on in the metadata timeline that the “Vulnerable” Tag is in the “Available Tags” column and
not in the “Active Tags” column.
