On the upper right of your screen (above the
animation palette) you should see the file palette. Use this
palette to browse through the image folder's
you'd created in step one to find the images you'll be using to
assemble the initial key-frame.
Before you begin using the images you might want to take
your time to give each image a custom pivot point.
(images default to a top-left pivot point, and its often more
convenient and leads to better final results
to set pivot-points based on actual aspects of the image in
question...for example, the image of an upper
arm would scale and rotate more naturally around a pivot point
set in the center of the shoulder).
To set a default pivot point for an image, double-click on that
image in the file palette and a dialogue box
will appear giving you the ability to set the pivot point.
You can use the quick-set icons at the top right of the dialogue
to set instantly and accurately set the default pivot point of the
currently selected image to any corner, center, or the middle of
any of its sides.
Once you've set the pivot point how you'd like,
click OK.
Setting Default Pivot Points
Spriter Pro User’s Manual version 1.4


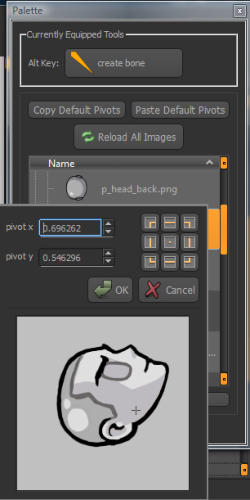
You might end up with several images that use the same size, especially in order for image swapping
purposes. In this case, don’t worry, you won’t have to set the same custom default pivot point ot them
all manually. Just set the custom default pivot point to one of them, then click the “Copy Default
Pivots” button Under the “Currently Equipped Tools” section of the Palette, then multiselect all the
images you want to have the same default pivot point and click the “Paste Default Pivots” button.
IMPORTANT: You might notice that once an image is placed on the canvas, you can left-click and drag
on the round widget designating the position of the pivot point to change it’s position. It’s very
important to know that this sets a NON-DEFAULT pivot-point, which actually tween betweens
keyframes. While this feature can be useful, (for example if you need at one point in an animation for an
image to rotate around a different pivot point), it can also be very confusion, and might not be well
supported by certain Spriter run-times. For this reason we recommend you avoid setting pivot points in
the canvas unless you not only need the special attributes of a non-default pivot point and you’re sure
the resulting animations will be properly supported by whichever run-time you will be using. (if any)
If you happened to set your images pivot points via the canvas accidentally, and had intended to use
default pivot-points, there are two features in Spriter that can help you switch to actual default pivot
points.
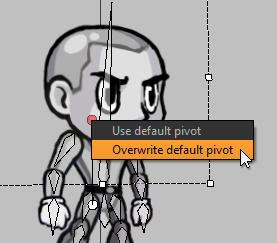
Example 1) Let’s say you’ve accidentally changed your
pivotpoint via dragging the round widget in the canvas,
and you would rather that the image use the universal
default pivot point which you had previously (or after
the fact) set via the proper way mentioned at the top of
this section. Just right-click on the actual round widget
representing the position of the pivot point in the canvas
and choose “use default pivot point” from the drop down
menu which will appear. This will revert the pivot point
to
the default pivot point, but leave the image exactly
where you had placed it.
Example 2) Let’s say you like the new position you’ve
set for the pivot point via the canvas and you want to
replace the current default pivot point with this new pivot
point position. Just right click on the round gizmo
representing the position of the current pivot point in the
canvas, but this time choose “Overwrite default pivot”
from the drop down menu that appears. This will make
your new pivot point position the new default pivot point
position, replacing whatever the old position was.