Ideally you’ll be able to use your tweened and optimized Spriter animations directly in the game authoring
system of your choice, but obviously this can’t always be the case. Sometimes you’ll need to create
animations for a game engine that can’t support Spriter files directly.
Similarly, sometimes you might create an animation for things like explosions which end up using dozens
of tweened, rotating and scaling images at once, but plastering your game-screen with lots of these
explosions might adversly effect your frame-rate. Therefore it would be better for your game if the
explosion could be converted to just a sequence of full frame images (to reduce the need for all the
seperate draws and tweening calculations).
For these types of circumstances, Spriter lets you export finished animations as sequential images at any
frame rate (number of frame images per second) you’d like.
Here’s how:
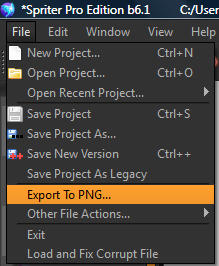
1) Once your animation is finished, make sure that animation is
selected in the Animations Palette and then from Spriter’s menu choose
File/Export To PNG.
Exporting Animations as Sequential Images or GIFs
Spriter Pro User’s Manual version 1.4


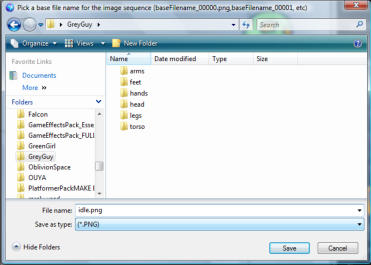
2) A file selector will appear, allowing you to designate the location
and name for the images to be saved. Navigate to or create the folder
you’d like the images to be saved in and then type the name for the
images and press enter or click on the save button.
3) The Export Keyframes To PNG Dialogue box
will appear, giving you a plethora of options to
choose from while exporting your animation as
sequential images. First, decide if you want to only
export the keyframes themselves, if you’d like to
export frames based on a specific number of frames
per second, or if you’d lust like to tell Spriter how
many frames total the export should create for the
entire animation. You can also just tell Spriter to
export an image per however many miliseconds
you’d like. These are the first 3 options in the
palette.
4) Using the second part of the export dialogue you
can decide how your animation will be trimmed. Most
of the time, You’ll want to leave it at the default
settings, as its sure to not accidentall clip (remove)
parts of any of the frame. But, if you want more
specific controll, or specifically want to crop the
animation, then you can use the settings in this part of
the palette to specify exact cropping coordinates. Just
click the grey rectangle that says “trim rect to
animation” and the other options will appear.
Choosing any of them will reveal additional settings
specific to that cropping option.
5) You can use the bottom section of the palette to decide at what scale you’d like to export your animation.
By default it will be set to 100 percent. (actual size). Just use these settings to determine what size you’d like
the animation exported to. Once you’ve decide and you’ve made sure all the settings from the previous steps
are correct, just click OK and the exporting will commence into the folder you had selected.
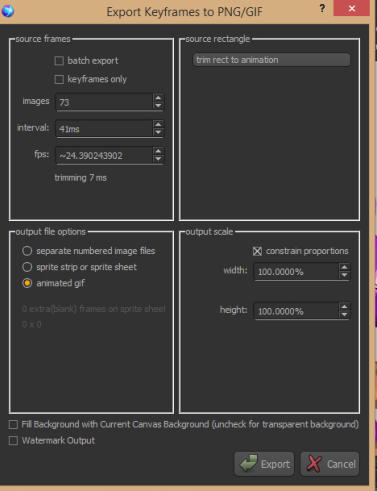
6) Notice the option checkbox called “batch export” at the top left of the export dialogue window. If you
check this option, you’ll be able to choose to export all or any number of specific animations all at once, all
with identical settings. This can save you tons of time and assure all animations are cropped (and trimmed) to
the same exact dimensions etc.
