Organizing your project folders and images before you begin.
Before you start up Spriter itself, it’s important to understand, Spriter is not used to draw images from
scratch, it's used to combine, move, rotate and stretch images you've already created in order to create
fully assembled frames and animations.
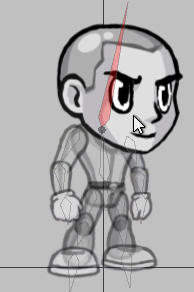
Step 8) (Creating bones to more easily animate complex
objects or characters) While you are not required to use
bones to animate with Spriter, and in fact, for many types of
animations bones would just be an inconvenience, for the case
of animating complex objects or characters the initial
investment of literally a minute or two to “rig” the character
with bones will end up making work much easier and
more natural, and save you a lot of time, even resulting in a
superior final animation. To create bones, simply hold the Alt
key and left click and drag from the point you want the bone to
begin to the point where you want the bone to end. The point
where the bone begins (the thick end) acts as the pivot point of
the bone. When you let go of the left mouse button that bone is
done being created and is automatically selected...if you create
a new bone while the previous bone is still selected, the new
bone will automatically be a child of the selected bone. You
can continue to hold Alt and create all of the bones you need
for the full character...just be sure the bone you want to be the
next bone's parent is selected while creating the new bone. At
any time in this process you can let go of the Alt key and
select, move, rotate and scale any of the bones to perfect their
position relative to the sprites you will be assigning to them.
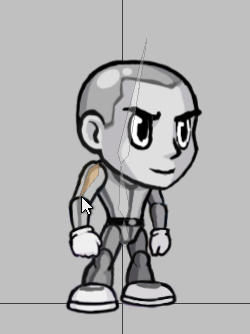
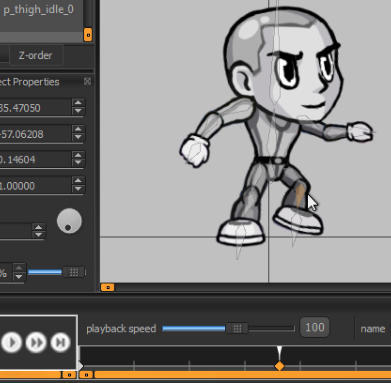
Step 7) (Aligning the assembled key-frame to the canvas
crosshair) Now that your first key frame is properly
assembled, you might want to make sure that the entire frame
(all sprites collectively) is aligned to the “canvas crosshair”
in a manner that will be most useful for game engines. The
point where the vertical and horizontal lines bisect the canvas
represent coordinate 0,0 for the frame. If you tell a game
engine to draw your frame to the screen at a given
coordinate, it will place the animation based on this 0,0 point
as it's pivot point or “hotspot”. In the case of this example,
for a platformer character, you'd likely want the 0,0
coordinate (canvas cross-hair) centered near the feet of the
character. To move all sprites at once you can press Cntrl+A
to instantly select all objects on the canvas or left click and
drag a selection rectangle to select all of the objects. You can
then use the arrow keys or click and drag on any of the
selected objects to move everything at once to properly align
the frame.
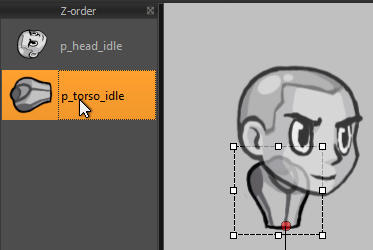
Step 6) (adjusting the z-order of sprites)
As you assemble and tweak your initial key-
frame you may need to adjust the z-order of
your Sprites. (the order in which they are
drawn on screen..in other words,
which are in front and which are behind).
This can be done by clicking and dragging
on the sprites in the z-order palette on the
upper-left of your screen or by selecting a
sprite on the canvas and then holding Cntrl
and pressing the up or down arrows. You
can also hold Cntrl and press the left or right
arrows to send the selected sprite to the
absolute top or bottom of the z-order
respectively.
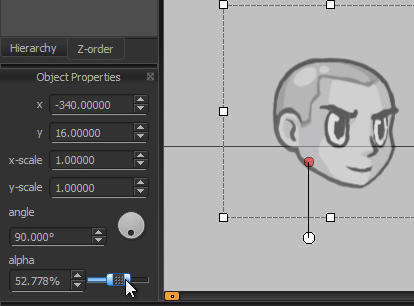
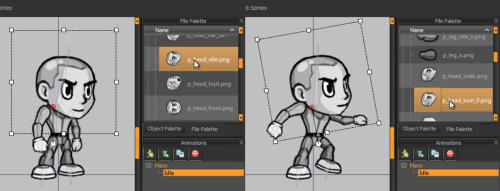
Step 5) (Adding Sprites to the canvas
and manipulating them) Now that
your images are ready to
use, you can simply start dragging
them from the file palette onto the
“canvas” in the center of your
screen to begin assembling the first
key frame. Once on the canvas, you
can select any Sprite (the
images you’ve placed) by left clicking,
and then use the transform controls
which appear around the
sprite to rotate it or stretch it as you
need. You can also use the “object
properties” dialogue on the
lower left of your screen to keep track
of or carefully edit any of the
currently selected sprites
attributes. This palette can also be used to adjust the currently selected sprite’s opacity.
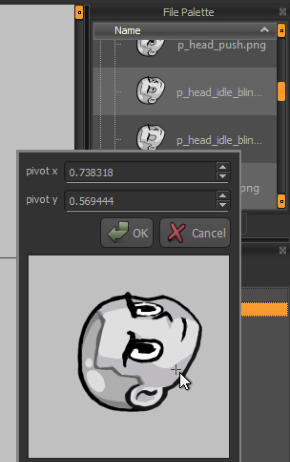
Step 4) (Setting default pivot points for Sprites) On the
upper right of your screen (above the
animation palette) you should see the file palette. Use this
palette to browse through the image folders
you'd created in step one to find the images you'll be
using to assemble the initial key frame. Before
you begin using the images you might want to take your
time to give each image a custom pivot point.
(images default to a top-left pivot point, and it’s often
more convenient and leads to better final results
to set pivot-points based on actual aspects of the image in
question...for example, the image of an upper
arm would scale and rotate more naturally around a pivot
point set in the center of the shoulder). To
set a default pivot point for an image, double-click on that
image in the file palette and a dialogue box
will appear giving you the ability to set the pivot point.
Once you've set the pivot point how you'd like,
click OK.
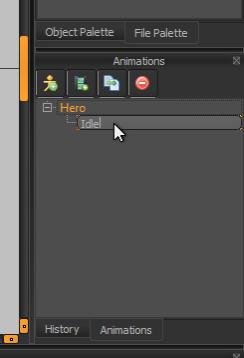
Step 3) toward the lower right of your screen you should see the
“animations palette” You'll see Spriter started your new project
file with its first entity (character) and first animation for that
character. You can double-click on the name of either to rename
them to something more descriptive... for example, you could
rename the entity to “hero”, and the animation to “idle”
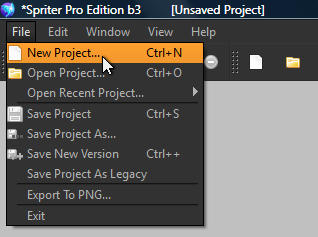
Step 2) (Starting Spriter and creating your project
file) Start Spriter and from the main menu
choose: File/New Project or hold Cntrl+N.
You will be prompted to choose the root folder for
your project. Click OK and then use the file
dialogue to direct Spriter to the main project folder
you had created.. In the case of our example, this
would be the folder called “Platformer”. Spriter's
working interface will then appear and you'll be
ready to begin creating your first key frame.
IMPORTANT! Once you begin your Spriter project, the actual Spriter file (.scml) should always be
saved in the main project folder which you'd created. You can save backup files of the .scml anywhere
you'd like, but if you then load them, they won't know where to find the required images because
Spriter only looks for images from the same root as the .scml file itself.
Creating the initial key-frame.
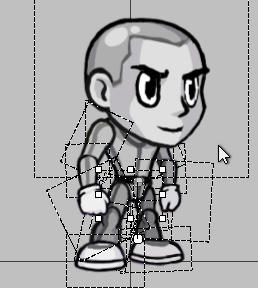
Step 9) (Assigning Sprites as children of bones) Now that your bones
are set up where you want for the whole character, properly aligned with
the sprites, you just need assign (child) the appropriate sprites to each of
them. To do this, simple select a bone by left clicking on it, and then
hold the B key...you'll see all Sprites become more translucent. Now if
you left click on any Sprite while still holding the B key, that Sprite will
become a child of the selected bone. You will see that it is now assigned
because the sprite is now more opaque. If you click that same sprite
again while holding B it will disassociate that sprite from the selected
bone. You can select as many sprites to each bone as you'd like. The
sprite does not have to be touching the bone, or even be close in
proximity to the bone. Once finished assigning all sprites to their
respective bones I recommend you quickly play with putting the
character in extreme poses with limbs overlapping the body and the
other limbs so you can double-check that all Sprites are z-ordered
properly. This way, you won't have to stop and manually fix the z-order
of sprites across several key-frames once you're animating.
Step 10) (Animating with bones and
sprites) If you've assigned sprites to
bones you'll see that if you rotate, move
or scale bones, the assigned sprites will
be affected with them. If all sprites are
assigned to bones you may not have a
need to ever select or edit a sprite
directly. If this is the case, you can lock
and/or even hide all sprites so that you
can not accidentally select or edit a sprite
by clicking on the show or lock buttons
along the top right of the canvas. You can
do the same for bones if you have a need at
any point to only edit sprites.To start
animating, first edit your starting frame by
selecting and moving, rotating, stretching or
changing the alpha (opacity) of any of the
sprites or bones. Then click on another
point along the timeline and then adjust the
sprite or bones as necessary to create the
next key frame. Editing any sprite or bone
while on a new point in the timeline will
automatically create a key frame. You can
also create a key frame at any time by
clicking on the “key all” button near the
bottom right of the canvas, or by clicking on
the key selected button while one or more
objects (sprites or bones) are selected. (See
Key All vs Key Selected for more
information)

Step 11) (Swapping a
sprite’s Image at any
time) You might have a
need in some animations
to actually swap out one
image with another at
some point. This can be
done by simply scrolling
to the point in the
animation you'd like an
image changed, selecting
the sprite by left clicking
on it in the canvas and then right-clicking any image in the file palette. When you play the animation or
scroll through the timeline you'll see that the sprite now changes from its original images to the new one
you'd selected at that exact moment in the animation.
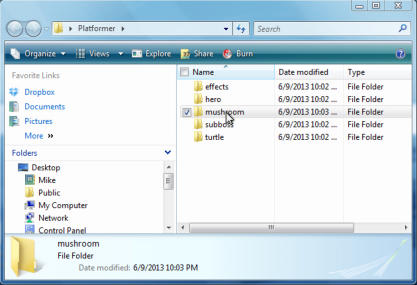
Step 1) (Getting your images ready)
Create a project folder which will be
used for your Spriter
project. Then add sub-folders in which
you should organize the PNG images
you'll be using to create
your animations. For example: If you
were creating animation sets for a
platformer game, you might
first create the project folder and name
it “Platformer” and then inside that
folder you would create
other folder named ”hero”,
“mushroom”, “turtle”, “effects”, “sub-
boss” etc and within each of those
folders you'd place the images you'll be
using to create and animate those
respective characters or objects.
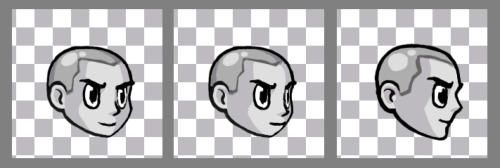
IMPORTANT: When
swapping, a new image
will be placed in the exact
location of the current
image based on their
respective pivot points, so
it's very important to have
the default pivot-point of
the new image set
appropriately. One way to
ensure perfect continuity
when swapping from one image to the next is to actually insure that each image to be swapped has the
same exact pixel-dimensions as each other, and are arranged so that all of their default pivot points would
have the same exact pixel
coordinate. Look at all these head images as an example... all images are buffered with enough
transparent pixels to ensure the actual head images are placed per image in perfect alignment with each
other... so the exact same default pivot-point coordinates can be set for all...ensuring there will be no
jarring “pop” in position as one image is switched to the next.
Step 12) (Editing the timing
of key frames or the entire
animation) You'll likely find
as your animation progresses
that you'll need to tweak the
relative distance between key
frames. To do so, you can
simple click and drag on any
key frame in the timeline
located at the bottom of your screen. You can also hold the Cntrl key in order to be able to select multiple
key frames so you can move them simultaneously.
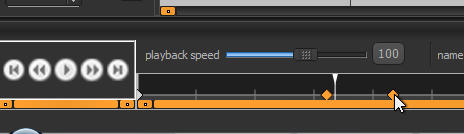
It will also often be
necessary to expand or
reduce the total length of the
animation. To do so you can
simply left click in the
second number box of the
“current time” section of the timeline. This will allow you to not only type in a new total length for the
animation, but will also present a check-box letting you either stretch the keys to maintain their relative
positions to each other or not. You can also preview your animation playing back at different speeds
simply by adjusting the playback speed slider at the left side of the timeline.

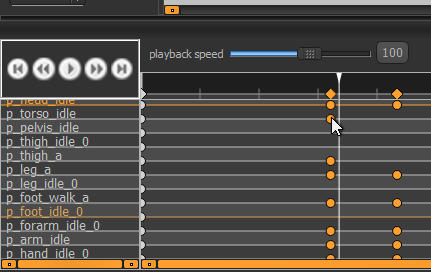
Step 13) (Advanced timeline
editing) As your animation gets
closer to being perfected, you might
find the need to slightly offset the
timing of one or more objects
relative to the rest. Spriter actually
keeps separate timelines and key
frame per object. To view and edit
them you need to expand the
timeline area upward by left
clicking the top of the timeline
window upward. Now you can left
click and drag to change the time
position of any objects key frames.
You can also delete them via the
delete key after selecting them.
Step 14) (Duplicating entire key frames) You can also copy and paste an entire full frame to any other
place on the timeline by choosing the position the timeline to copy on the main timeline, then pressing
Cntrl+Shift+C, then by going to the target location on the main timeline and pressing Cntrl+V. This even
works if you are copying from a spot in the timeline that is not keyed. This is often a fantastic way to start
a new animation for a character...by finding an point in an animation you'd already created that comes
somewhat close to the starting pose for the new animation. Just Cntrl+Shift+C to copy the initial pose
from an already existing animation, and then create your new animation, make sure you are at time 0 (the
very beginning) on the main timeline of the new animation, and then press Cntrl+V.
Step 15) (Adding additional sprites to a finished animation) What if you've already created an entire
animation, with lots of key frames, but then decide you should add something to the character...like
sunglasses for example? Spriter makes this easy. If you've animated your character with bones then
Spriter makes the solution simple. Simply go the the very first key frame at time 0, add your sunglasses
image to the frame and perfect its position, scale, rotation etc to fit perfectly on the character’s face. Then
assign that new sunglasses sprite to the head bone by selecting the head bone, holding B and then left-
clicking on the sunglasses sprite. You can test that the sunglasses are now firmly attached to the
character’s face by rotating the head bone, and then pressing Cntrl+Z to undo the movement. Now that
the sunglasses are perfectly placed and a child of the head bone, just select them, press Cntrl+C, then in
the menu, choose “edit/paste to all keys”, or by pressing Cntrl+Shift+V. After perhaps a few seconds of
processing, you can scroll through your timeline or play your animation to see that the sunglasses are now
properly positioned and attached to the head on all frames.
Quickstart


